Thứ Ba 22/09/2015 5:05
How to Mirror Your MacBook Display On Your Projector
When you connect your MacBook to your projector for the first time, you may notice all you can see is your background. That is because, by default, your MacBook is connectng to the projector as if it is a second monitor, so you can move back and forth between the two screens.
But, for teaching this is not normally ideal. What you want is to project exactly what is showing on your screen. Apple calls this "Mirroring." Follow these steps to enable mirroring on your MacBook.
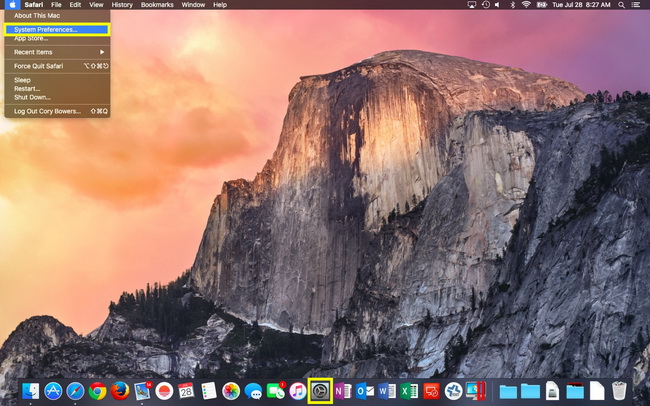
1./ Open System Preferences, which can be found in the Apple ()
Menu or using the gearbox icon on your dock.
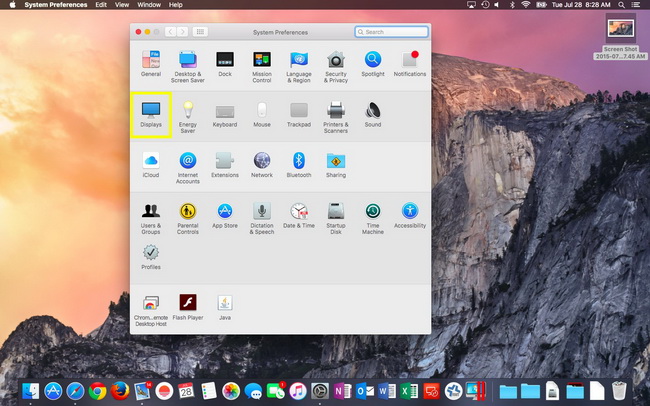
2./ In System Preferences, click on "Displays."
If you have not already, please connect your projector to your
MacBook using your VGA adapter, it is required for this next step.
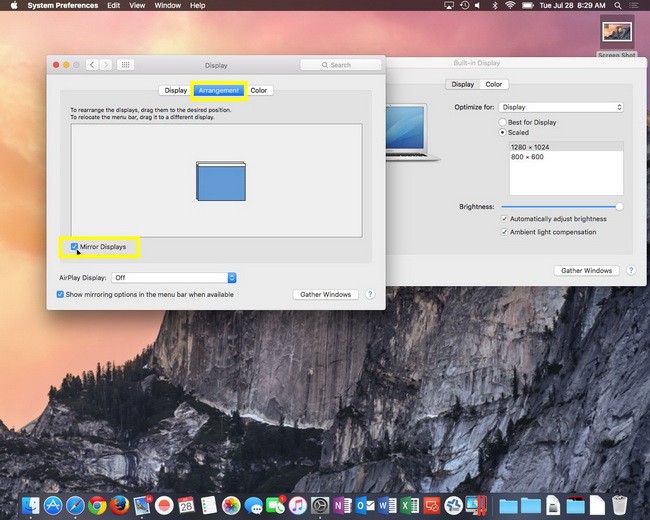
3./ Go to the "Arrangement" tab and check the box for "Mirror
Displays."
You may need to adjust your resolution so your your projector
doesn't look fuzzy or REALLY BIG or really small.
4./ Go to the "display" tab and select "Scaled" to manually change
the resolution. For most of our projectors, you will want to choose
1024 X 768. But feel free to select others and pick the best one for
you.

NOTE: Your MacBook display will change based on the resolution
you choose as well. You may have black bars on the sides, this is
normal. The black bars will disappear once you disconnect the
projector.
Tags:
Tin liên quan:
- Bán ổ cắm cao cấp 4 tầng 2 cổng sạc cho điện thoại máy tính bảng chất lượng giá rẻ nhất tp hcm (24/11)
- Cung cấp bán cáp USB 3.1 Type C ra HDMI kết nối thiết bị với màn hình hỗ trợ hình ảnh full hd 1080p (13/12)
- Dây cáp Mini DisplayPort to HDMI - Mini DisplayPort sang HDMI hỗ trợ 2k 4k (29/01)
- cáp chuyển đổi từ jack 3.5 ly sang ngõ AV giá rẻ (01/07)
- Cửa hàng bán cáp Vga Dtech 15m (03/05)
- Cáp tín hiệu HDMI to vga unitek phụ kiện dây nối tín hiệu thiết bị ra máy chiếu màn hình LCD (08/01)
- Thiết bị Cáp chuyển đổi DisplayPort to VGA cho máy chiếu (05/04)
- Cáp kết nối điện thoại máy tính bảng với tivi - Skiva MHL Micro USB to HDMI 2m tại Hà Tĩnh (02/06)
- Hướng dấn lấy âm thah từ tivi LG ra âm li - Bộ chuyển âm thanh Fiio D3 giá rẻ chính hãng (30/05)
- Phụ kiện cáp chuyển usb-c ra 3 port usb 3.0 chia cổng kết nối máy tính (17/01)